
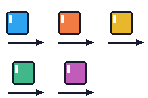
To turn an animated GIF into a sprite animation in Unity, export its displayed frames into a PNG grid, import that PNG as Sprite (2D and UI) → Multiple, slice the grid into individual sprites, and animate the sprites in their original order. If the GIF uses different delays for different frames, you must also recreate those holds in the Unity animation. Setting one FPS value for the whole clip does not automatically restore unequal GIF delays.
The Unity menu names in this guide follow the Unity 6.0 (6000.0) documentation, with the 2D Sprite core package (com.unity.2d.sprite) installed. Other Editor releases may display controls differently. The image and timing example below was generated and checked outside Unity; its Unity Editor import and playback were not measured here.
Start with the GIF's frames and delays
A GIF is more than a collection of equally timed pictures. Its graphics can have separate display delays, and some files store small updates to an earlier image instead of a complete standalone picture. Export the reconstructed image the viewer would display at each step, not just an undecoded patch. The GIF Frame Extractor is useful for examining the complete displayed frames before you arrange them into a sheet. For the underlying rules, see the GIF89a specification and ImageMagick's explanation of -coalesce.
Before converting, record four details: the logical canvas width and height, the number of displayed frames in order, each frame's delay, and whether the sequence loops. Keep the original GIF alongside your PNG export so you can compare timing later. If you prefer a command-line inspection, ImageMagick can show the stored rectangle and delay of each frame and reconstruct full displayed images:
magick identify -format 'frame=%s delay_cs=%T rect=%wx%h offset=%X,%Y\n' input.gif
magick input.gif -coalesce displayed_%03d.png
For ordinary GIF files, the reported delay_cs is in centiseconds. A stored rect smaller than the logical screen does not mean the displayed animation is supposed to be cropped. The coalesced export is the suitable input to a regular Unity sheet.
GIF89a stores nonzero delay values in hundredths of a second: a value of 10 means 100 ms, not 10 ms. A missing or zero delay should not be silently turned into an assumed FPS; playback programs may treat extremely short or zero delays differently. Pillow, for example, reports the current frame's duration in milliseconds when present, which is a convenient inspection value rather than a Unity animation setting (Pillow GIF documentation).
A five-frame example: same total length, different holds
The original example contains two, transparent, 48 × 48-pixel GIFs, each containing five visible frames. One uses 200 ms per frame; the other uses 100, 200, 300, 100, and 300 ms. Both last 1,000 ms per cycle and therefore average five distinct source frames per second over that cycle. But they do not show the frames at the same times.
| Source frame (zero-based) | Unequal delay | Starts at | Uniform control starts at |
|---|---|---|---|
| 0 | 100 ms | 0.00 s | 0.00 s |
| 1 | 200 ms | 0.10 s | 0.20 s |
| 2 | 300 ms | 0.30 s | 0.40 s |
| 3 | 100 ms | 0.60 s | 0.60 s |
| 4 | 300 ms | 0.70 s | 0.80 s |
| End of cycle | 1.00 s | 1.00 s |
The delays were read back from the generated GIF files and the cumulative start times are calculated from those delays. In this fixture, ImageMagick inspection also showed later stored GIF rectangles as small as 38 × 42 px even though the displayed canvas is 48 × 48 px; independently coalesced frames recovered the intended 48 × 48 displays. A Unity clip that changes to each successive image every 0.20 seconds would match the uniform GIF, not the unequal one—even if both loops took a full second.
Export a PNG sheet with a predictable grid
For the original sample, the PNG grid and delays are available in the download below. To export your own file, open the GIF to Sprite Sheet tool and use its grid, gap, and scale options. For your first import, retain every source frame, preserve the complete frame canvas, and avoid cropping different poses to different sizes. Export the PNG; keep the delay/coordinate JSON as a separate reference if you export it.
For the five-frame example, use three columns, two rows, 48 × 48-pixel cells, and a 2-pixel horizontal and vertical gap, with no outer margin. Fill cells from left to right across the first row, then continue on the second row. The sixth cell is unused.
| Sheet property | Example value |
|---|---|
| Cell width × height | 48 × 48 px |
| Columns × rows | 3 × 2 |
| Gap between cells | 2 px horizontally, 2 px vertically |
| Outer margin | 0 px |
| PNG width | 3 × 48 + 2 × 2 = 148 px |
| PNG height | 2 × 48 + 1 × 2 = 98 px |
The five occupied cells begin at (0, 0), (50, 0), (100, 0), (0, 50), and (50, 50) in top-left-origin PNG pixel coordinates. These coordinates describe where the images appear in the sheet; they do not themselves set the animation order or speed.
Check the PNG at full size. A solid background unexpectedly replacing transparency, two images sharing one cell, or a missing frame should be corrected before Unity import. For complex GIFs, the result must contain the fully composed displayed frames. A grid image cannot repair incomplete patches afterward.
About the JSON: the site's optional JSON is a custom coordinate/timing reference, not a native Unity Sprite Editor data format. Importing the PNG does not cause Unity to read that JSON or automatically apply its delays. Unity's manual SpriteRect coordinates also use a bottom-left Y origin, whereas the example coordinates above start at the PNG's top-left; do not paste one coordinate convention into the other without conversion.
Import the sheet into Unity 6.0
Open a 2D Unity project and place the PNG in its
Assetsfolder. Select the imported texture in the Project window.In the Inspector, set Texture Type to Sprite (2D and UI) and Sprite Mode to Multiple. Set Alpha Source to Input Texture Alpha if the image has transparency. For this 48-pixel example, Pixels Per Unit = 48 makes one full cell one Unity world unit tall.
If the artwork is hard-edged pixel art, start with Filter Mode = Point (no filter), Compression = None, and no generated mipmaps; check any platform-specific import overrides and ensure the texture's maximum size does not reduce the 148 × 98 source. These are practical quality settings, not a requirement for every painterly sprite sheet.
Apply the import settings. Select Open Sprite Editor. If that control is missing, check the 2D Sprite package in the Package Manager; the relevant package is
com.unity.2d.sprite, not the separate skeletal-animation package named 2D Animation.
Unity's sprite import reference documents Multiple mode, alpha settings, filtering and Pixels Per Unit. The Unity 6.0 2D Sprite documentation confirms that Sprite Editor tooling depends on the 2D Sprite package.
Slice by cell size, including the gap
In Sprite Editor, select Slice → Grid By Cell Size. For our test PNG, enter:
Pixel Size: 48 × 48
Offset: X = 0, Y = 0
Padding: X = 2, Y = 2
Pivot: one consistent choice for all frames, such as Center or Bottom
Keep Empty Rects: off, so the unused sixth position is not intentionally retained
Choose a slicing method that does not unintentionally replace carefully edited existing SpriteRects; for a fresh sheet, Delete Existing is reasonable. Select Slice, inspect the rectangular outlines, and select Apply to save them. Unity 6.0 explicitly supports Grid By Cell Size, Offset, Padding, Keep Empty Rects and the Slice/Apply steps (cut out sprites; Sprite Editor controls).
Do not select Automatic merely because the image has a transparent background: Automatic looks for opaque regions, which can split a pose into pieces or produce different-sized bounds. Grid slicing keeps each character pose inside the same 48 × 48 canvas.
Back in the Project window, expand the PNG to inspect the child sprites. Confirm there are five intended nonempty frames, not a playable sixth transparent frame. Check the top-right frame before the next row's leftmost frame. Sprite enumeration and displayed asset names are not a substitute for checking the animation order: rename the sprites to gif_00 through gif_04 if helpful, then select them deliberately in that sequence. The Sprite Sheet Splitter can recover individual cells from a regular grid if you need to compare their images separately.
Build and order the animation
For a basic looping animation, select the five correctly ordered sliced sprites in the Project window and drag them into the Scene. Unity's sprite-animation workflow can create an Animation Clip, Animator Controller, and Animator for the resulting GameObject. Save the assets where Unity prompts you. To inspect or edit the clip, select the GameObject and open Window → Animation → Animation; view the Sprite Renderer → Sprite keyframes in Dopesheet mode. If you prefer to start with an existing GameObject, make sure it has a Sprite Renderer and create a new clip from the Animation window instead.
Check that the keys point to sprites 0, 1, 2, 3, and 4 in order. In particular, the first sprite of the bottom row should come after, not before, the final sprite of the top row. Scrub the playhead to preview the changing Sprite Renderer image. See create an Animation Clip, and use the Animation view.
For the uniform 200 ms control, five equally spaced sprite changes per second are a reasonable starting setup: use a clip sampling grid of 5 samples per second (where exposed) and inspect the five keys at 0.00, 0.20, 0.40, 0.60 and 0.80 seconds. Also inspect the loop boundary: the last sprite must stay visible until the one-second boundary, not restart as soon as its key at 0.80 seconds is reached. Adjust the effective clip duration/end key as needed and verify in Play mode. The Samples setting controls the animation's keyframe time grid; it does not guarantee that a player renders exactly that many visual updates each second.
Preserve unequal GIF delays: place the changes at their actual times
A GIF with unequal delays needs unevenly spaced sprite changes. Do not take its frame count, divide by total duration, enter the resulting average FPS, and assume the timing is restored. Our test GIF's average is also five source frames per second, yet equal five-FPS playback changes the second frame 100 ms too late and the last frame 100 ms too late.
For the unequal example, keep the clip's Sprite Renderer → Sprite property keyed at these start times:
| Animation time | Sprite to show | Hold until |
|---|---|---|
| 0.00 s | gif_00 | 0.10 s |
| 0.10 s | gif_01 | 0.30 s |
| 0.30 s | gif_02 | 0.60 s |
| 0.60 s | gif_03 | 0.70 s |
| 0.70 s | gif_04 | 1.00 s |
| 1.00 s | clip boundary (repeat last image to establish end) | next cycle returns to gif_00 |
An Animation window sampling grid of 10 samples per second can express every timestamp in this particular table as a whole grid step (frames 0, 1, 3, 6, 7 and 10). This is a calculated keyframe placement plan, not a claimed Unity playback measurement. Move the keys in Dopesheet mode or record each sprite at the corresponding time. Make sure the clip lasts 1.00 s, including the last 300 ms hold, and enable the desired looping behavior. If the clip cuts back to the first sprite at 0.70 s, the last hold has been lost even though the first five keys are in order.
A more general GIF might need start times such as 0.07 or 0.23 seconds. Because GIF timing is stored in centiseconds, a 100-samples-per-second edit grid can represent nonzero centisecond values mathematically; a 10-samples-per-second grid cannot represent every such delay without rounding. Even correctly timed keyframes are displayed on Unity's rendered frames, so exact wall-clock frame presentation is limited by the player's frame scheduling and device refresh rate. Very short holds may never appear on a slow display.
For animations that need timing controlled at runtime rather than by a clip, an alternative is a Sprite Renderer script that stores a Sprite[] and a separate array of delays in seconds. For each Unity update it computes the elapsed time within the total cycle, finds which cumulative delay interval contains that time, and displays the matching sprite. Such a script still needs editor compilation and in-game verification, and should not compete with an Animator that also writes to the same Sprite Renderer. It is not a built-in importer for the site's custom JSON.
Skipping every other GIF frame is not an equivalent shortcut: a skipped frame's display time must be assigned deliberately to an adjacent retained image, and the motion changes. Start with every frame when fidelity matters.
Verify timing and playback in Unity, not just in the sheet
After importing, check the animation in both the Animation window and Play mode. For this five-frame unequal example, a useful inspection worksheet is:
| Time within the 1-second loop | Expected sprite |
|---|---|
| 0.05 s | gif_00 |
| 0.20 s | gif_01 |
| 0.45 s | gif_02 |
| 0.65 s | gif_03 |
| 0.85 s | gif_04 |
| 1.05 s | gif_00 (second loop) |
These are expected results from the source delay table; they are not reported measurements from a Unity Editor. Record the actual clip length, Animator playback speed, loop settings, rendered sprite at each sampled time, and any mismatch. If the selected clip plays only when previewed, check its Animator Controller assignment and GameObject state in Play mode. Compare the visual sequence with the original GIF, but use recorded GIF delays and measured Unity playback to judge timing rather than relying only on how a GIF happens to play in a browser.
Fix common conversion and import problems
| What you see | Likely cause | What to check |
|---|---|---|
| Too many sprites, including a blank | Unused cells in the final grid row | Disable Keep Empty Rects where appropriate; exclude blank sprites from the clip |
| Cuts across the artwork or shifts into the gap | Wrong cell size, padding, or outer offset | Use the exported cell dimensions and gap; do not divide 148 by 3 and call that the cell width |
| Images play in a strange order | Child sprite selection/order differs from GIF sequence | Label source frames 00–04; inspect each animation key, especially row transitions |
| Faint trails or missing limbs | Raw GIF patch exported rather than complete displayed image | Re-extract reconstructed frames with disposal taken into account |
| Bright/dark outlines on transparency | Filtering, matte RGB, or compression | Compare the RGBA PNG; try Point, Clamp, Alpha is Transparency, and reduced compression as appropriate |
| Character jumps position | Different crop boxes or pivots | Keep a common logical canvas, common cell dimensions and one consistent pivot |
| Motion looks too fast, too slow, or loses the last pause | Equal spacing used for unequal delays; clip loop ends early; playback speed altered | Check cumulative start times, last hold, clip duration, loop option and Animator speed |
| JSON produces no sprites | Custom JSON is not a Unity importer | Slice the PNG normally; use JSON only as a manual coordinate/timing reference unless a separate importer is written |
The simplest reliable path is to treat the PNG as the visual source, the recorded delay list as the timing source, and Unity's Sprite Editor plus animation timeline as the reconstruction steps. Confirm all three. A successful PNG import alone does not prove that the original GIF animation has been reproduced.
Try the original examples
Original GIF controls, PNG grid and timing reference ↓Synthetic examples for inspection and learning. Keep your original media unchanged.
GIF delays, PNG dimensions and visible cell pixels were checked outside Unity. Editor steps follow version-pinned Unity 6 documentation; in-editor import, screenshots and playback are not claimed as tested.
Examples and calculations are scoped to their stated settings. Source links support the instructions; an illustration is not a screenshot of an application test.